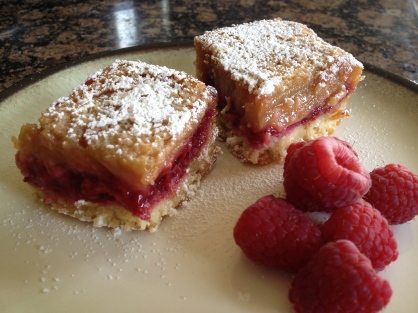
I think we need a bit of an upper after my most recent post. It was cathartic to get all that off my chest but now it’s time to take a deep breath and talk about something fun and delicious. Something lemony and fabulous and oh so simple.
Raspberry Lemon Bars. A treat born of necessity that turned out to be kind of awesome.
I know you might be thinking treats aren’t really a necessity but I beg to differ. They are. They are good for your soul. They will make people eager and happy to come visit you because people love treats. And some people with three children who can’t stand the thought of dealing with all those carseats ONE MORE DAMN TIME love visitors. Hence, treats.
Also, if you are a treat-maker who happened upon a sale on raspberries and maybe over-bought because you forgot that raspberries only stay fresh for about six minutes after your bring them home then you get raspberry treats. And that’s where these addictive bars come in. I had raspberries that needed to be used and a hankering for lemon bars. So I used my very favorite Lemon Bar recipe from Eat, Live, Run with a few fun modifications. (Slightly off topic…her crock pot beef carnitas are really good. One of my go-to recipes for when I want something seriously tasty and seriously easy.)
Raspberry Lemon Bars
for the crust
1 cup all purpose flour
1/2 cup shredded coconut*
1/4 cup confectioners sugar
1/4 tsp sea salt
1 stick cold butter
for the raspberry layer
1 pint fresh raspberries
2 Tbs granulated sugar
1 Tbs water
2 Tbs cornstarch
for the lemon filling
1 1/4 cups granulated sugar
1/4 cup all purpose flour
4 eggs
2 tsp lemon zest
2/3 cup freshly squeezed lemon juice
Preheat oven to 350. Grease an 8 or 9 inch square baking pan. Both work fine, the 8 inch pan results in a thicker bar. You can also line the pan with parchment paper if you’d like. That makes it easy to lift the bars out whole and slice them on a cutting board or something instead of slicing then scooping them out of the pan. I’m pretty terrible at doing that without destroying them so I always opt for the parchment paper. But you do want you want. It’s your rodeo.
To make the crust: Combine the flour, sugar, coconut and salt in a bowl. Cut the cold butter into the flour mixture, using your fingers or a pastry cutter, until the bits of butter are about the size of small peas. This may still look pretty flour-y. That is ok. Don’t be afraid. Press the mixture into the pan and bake for about 20 minutes or until just lightly golden. (Lazy person tip: Wipe out this bowl after you put the crust into the pan, that way you can use it to mix up the lemon filling. One less bowl to wash later. You win.)
To make the raspberry layer: Once your crust is in the oven, it’s time to make the raspberry layer. This is super easy. Put the raspberries, sugar, water and cornstarch into a small saucepan. Cook over medium heat, stirring frequently and smashing up the raspberries, until the mixture is thick and bubbly. Then turn the heat down to low just to keep it warm until it’s time to spread it on the crust. Give is stir here and there just to keep it loose.
To make the lemon filling: Whisk together the granulated sugar and flour in a bowl. Add the eggs, one at a time, whisking well after each addition. Add the lemon zest and juice and mix until everything is smooth and combined.
To assemble: Spread the raspberry mixture over the hot crust, smoothing it out evenly. Then pour lemon filling over the raspberry layer and return to oven to bake for another 20-25 minutes or so. When done, the filling will no longer jiggle. Let cool completely in the pan before slicing and dusting with powdered sugar. Make sure to invite people over to share these with you. Or just plan to eat kale and do jumping jacks for the next week after you eat the entire pan. Whatever you prefer.
* I have used both sweetened and unsweetened shredded coconut for this recipe. Both are delicious. Generally I keep the unsweetened kind around so that’s what I prefer to use. Also, this recipe already has a ton of sugar in it so you don’t really need the extra sweetness of sweetened coconut. That said, the sweetened coconut sort of caramelizes in the crust while baking and adds a really lovely flavor so you can truly go either way. Just use what you have.
Finally, if you happen to end up with a little extra raspberry “jam”, do not throw it out! I had a couple of tablespoons left over after I spread it on the crust so I kept it in the fridge overnight and stirred it into my oatmeal the next morning. It was SO GOOD. You should do it too.
