Buttered Popcorn Cookies

This is basically going to be a fangirl post followed by a recipe.  You’ve been warned.  If you don’t like carbs or cookbooks…well, then I’m not sure why you’re here but maybe I can convert you because these cookies are FUN!

IMG_1100


But first, the cookbook!  I’ve been a fan of smitten kitchen for a long time.  It’s easily my favorite food blog and Deb’s recipes never fail.  Her Buttermilk Roast Chicken and Mom’s Apple Cake are comfort food staples at my house.  When I heard she had a cookbook coming out I was thrilled and I have no idea what took me so long to get my hands on it.  As it turns out I ended up receiving two copies of The Smitten Kitchen Cookbook for Christmas and it has been everything I hoped it would be.  Great photography, delicious recipes, adorable anecdotes…absolutely classic.  I foresee myself cooking from this book for years to come.


This popcorn cookie recipe was very intriguing to me.  I had never even considered putting popcorn in cookies before and honestly only made this recipe because I thought my kids would like and it seemed über simple.  As it turns out, not only was it über simple but it was addictive; a fabulous combination of salty and sweet.  The flavor is similar to caramel corn but without the cloying sweetness that can sometimes have.  Add to that the chewiness of cookie mixed with the crunch of popcorn and it’s just perfection.

IMG_1091 IMG_1096


Make this happen for yourself.  You will not regret it.

Smitten Kitchen Buttered Popcorn Cookies

2 Tbs oil

1/4 cup popcorn kernels

1/4 tsp table salt

1 Tbs butter – melted

1/2 cup (1 stick) butter – softened

1/2 cup packed light brown sugar

1/3 cup granulated sugar

1 large egg

1/2 tsp vanilla

1 1/4 cups all-purpose flour

1/2 tsp baking soda

Make the popcorn: Pour the oil in the bottom of a large saucepan (with lid) and add the popcorn kernels.  Shake the pan around so the kernels land in a single layer over the bottom of the pan.  Cover the pot, heat over medium-high heat and once the kernels start popping keep the pan moving until all the kernels have popped.  Toss the table salt and melted butter over the popcorn.  You may want to transfer the popcorn to another bowl so you can fish out any unpopped kernels.  You should have about 4 to 4 1/2 cups of popcorn.

Mix the dough: Preheat your oven to 350.  In a large bowl, cream together the softened butter, brown sugar, granulated sugar, egg and vanilla until smooth.  In a separate bowl, whisk together the flour and baking soda.  Stir the combined dry ingredients into the butter-sugar mixture.  Fold in the popcorn so it’s evenly distributed throughout the batter.  This will seem impossible at first because the batter to popcorn ratio is crazy but I promise, it works.  Just keep at it for a minute or two and don’t worry about some of the popcorn breaking up.  It all turns out great in the end.

Bake the cookies:  Scoop heaping tablespoon sized mounds 2 inches apart onto a parchment-lined baking sheet.  Bake the cookies for 10-12 minutes, until the edges are light brown.  Let them sit on the hot baking sheet for a few minutes to firm up before transferring them to a cooling rack.

Raspberry Lemon Bars

I think we need a bit of an upper after my most recent post.  It was cathartic to get all that off my chest but now it’s time to take a deep breath and talk about something fun and delicious.  Something lemony and fabulous and oh so simple.

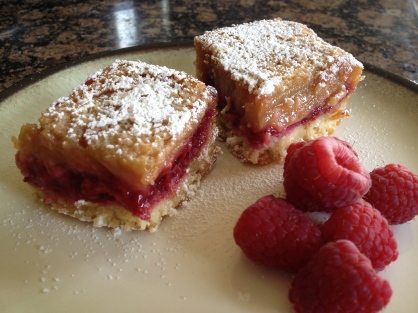
Raspberry Lemon Bars.  A treat born of necessity that turned out to be kind of awesome.

I know you might be thinking treats aren’t really a necessity but I beg to differ.  They are.  They are good for your soul.  They will make people eager and happy to come visit you because people love treats.  And some people with three children who can’t stand the thought of dealing with all those carseats ONE MORE DAMN TIME love visitors.  Hence, treats.

Also, if you are a treat-maker who happened upon a sale on raspberries and maybe over-bought because you forgot that raspberries only stay fresh for about six minutes after your bring them home then you get raspberry treats.  And that’s where these addictive bars come in.  I had raspberries that needed to be used and a hankering for lemon bars.  So I used my very favorite Lemon Bar recipe  from Eat, Live, Run with a few fun modifications.  (Slightly off topic…her crock pot beef carnitas are really good.  One of my go-to recipes for when I want something seriously tasty and seriously easy.)

IMG_4047

Raspberry Lemon Bars

for the crust

1 cup all purpose flour

1/2 cup shredded coconut*

1/4 cup confectioners sugar

1/4 tsp sea salt

1 stick cold butter

for the raspberry layer

1 pint fresh raspberries

2 Tbs granulated sugar

1 Tbs water

2 Tbs cornstarch

for the lemon filling

1 1/4 cups granulated sugar

1/4 cup all purpose flour

4 eggs

2 tsp lemon zest

2/3 cup freshly squeezed lemon juice

Preheat oven to 350.  Grease an 8 or 9 inch square baking pan.  Both work fine, the 8 inch pan results in a thicker bar.  You can also line the pan with parchment paper if you’d like.  That makes it easy to lift the bars out whole and slice them on a cutting board or something instead of slicing then scooping them out of the pan.  I’m pretty terrible at doing that without destroying them so I always opt for the parchment paper.  But you do want you want.  It’s your rodeo.

To make the crust:  Combine the flour, sugar, coconut and salt in a bowl.  Cut the cold butter into the flour mixture, using your fingers or a pastry cutter, until the bits of butter are about the size of small peas.  This may still look pretty flour-y.  That is ok.  Don’t be afraid.  Press the mixture into the pan and bake for about 20 minutes or until just lightly golden.  (Lazy person tip: Wipe out this bowl after you put the crust into the pan, that way you can use it to mix up the lemon filling.  One less bowl to wash later.  You win.)

To make the raspberry layer: Once your crust is in the oven, it’s time to make the raspberry layer.  This is super easy.  Put the raspberries, sugar, water and cornstarch into a small saucepan.  Cook over medium heat, stirring frequently and smashing up the raspberries, until the mixture is thick and bubbly.  Then turn the heat down to low just to keep it warm until it’s time to spread it on the crust.  Give is stir here and there just to keep it loose.

To make the lemon filling: Whisk together the granulated sugar and flour in a bowl. Add the eggs, one at a time, whisking well after each addition. Add the lemon zest and juice and mix until everything is smooth and combined.

To assemble: Spread the raspberry mixture over the hot crust, smoothing it out evenly.  Then pour lemon filling over the raspberry layer and return to oven to bake for another 20-25 minutes or so.  When done, the filling will no longer jiggle. Let cool completely in the pan before slicing and dusting with powdered sugar.  Make sure to invite people over to share these with you.  Or just plan to eat kale and do jumping jacks for the next week after you eat the entire pan.  Whatever you prefer.

* I have used both sweetened and unsweetened shredded coconut for this recipe.  Both are delicious.  Generally I keep the unsweetened kind around so that’s what I prefer to use.  Also, this recipe already has a ton of sugar in it so you don’t really need the extra sweetness of sweetened coconut.  That said, the sweetened coconut sort of caramelizes in the crust while baking and adds a really lovely flavor so you can truly go either way.  Just use what you have.

Finally, if you happen to end up with a little extra raspberry “jam”, do not throw it out!  I had a couple of tablespoons left over after I spread it on the crust so I kept it in the fridge overnight and stirred it into my oatmeal the next morning.  It was SO GOOD.  You should do it too.

Recipe: Texas Sheet Cake Cupcakes

This past weekend we celebrated The Hubs’ birthday.  We hosted a party here at home.  There was tasty BBQ to eat along with fun munchie foods, delicious salads (courtesy of my fabulous sisters-in-law) and an enormous pile of cookies from my mother-in-law.  A pile of cookies that seemed to disappear almost instantly once she set it down.  Now I can’t compete with those cookies, but I can say with confidence that the chocolate cupcakes I made were enjoyed with nearly equal enthusiasm.  They were hands down the best chocolate cupcakes I’ve ever made.  And I’ve made at least three times as many cupcakes as I have margaritas in my life so I’m pretty much an expert.  An expert at gluttony, apparently.

If you’ve never had Texas Sheet Cake then you are in for a treat but you should know up front that this isn’t going to be crazy, gooey, devils-foody cake that you’re making.  It’s rustic and homey.  It’s totally unassuming and low-maintenance.  It doesn’t require you to sift this or run out and buy dutch process that.  It won’t ask you to pour it a cocktail and rub its feet while fast-forwarding all the commercials on the latest episode of True Blood.  That’s just not how this cake rolls.  This is the kind of cake you take to a barbecue, a pot luck or a picnic.  You can also eat it straight out of the oven with no frosting at all while you congratulate yourself on your awesomeness.  Coincidentally, that is my favorite way to eat this cake.  A close runner-up would be at breakfast with iced foffee.  Carpe Diem, people.

Texas Sheet Cake Cupcakes

Yields 24 cupcakes

For the cupcakes:

2 Cups flour

2 Cups sugar

1/4 tsp salt

4 heaping Tbs unsweetened cocoa powder (I used Ghirardelli)

2 sticks unsalted butter

1/2 Cup boiling water

1 Cup buttermilk

2 eggs

1 tsp baking soda

1 tsp vanilla

  1. Preheat oven to 350 degrees.  Line two muffin pans with paper liners and set aside.
  2. In a large bowl, combine flour, sugar and salt.  Set aside.
  3. In small saucepan, melt the butter.  Once it is melted, stir in the cocoa powder and boiling water.  Mix until well combined.  Then add to dry ingredients and stir until just combined.
  4. In a small bowl or measuring cup, whisk buttermilk, eggs, baking soda and vanilla.  Stir into the chocolate/flour mixture and mix until fully incorporated.
  5. Fill the prepared muffin pans with batter and bake cupcakes for 18-20 minutes, until a toothpick inserted in center comes out clean. Don’t over bake.
  6. Allow to cool completely on a wire rack before frosting.


For the frosting:

1 3/4 sticks butter, melted

4 heaping Tbs cocoa powder

6 Tbs buttermilk (or milk, but I think the very slight tang of the buttermilk is really nice)

1 tsp vanilla

4 Cups powdered sugar (you can go a little easy on this if you prefer.  I used about 3 1/2 cups)

1/2 cup chopped pecans (classic for this type of cake, but totally optional)


  1. Melt butter in saucepan.
  2. Pour into large mixing bowl and add in cocoa powder, buttermilk and vanilla.  Whisk until smooth.
  3. Add in powdered sugar and finally pecans, if using.
  4. Frost the cupcakes!

A couple of notes about the frosting; you could choose to mix it all entirely in a large saucepan if you didn’t feel like messing up another bowl. Just be sure to take the pan off the heat.

You might want to sift the powdered sugar into the frosting.  I know, I know…I said no sifting!  And you don’t have to by any means.  You’ll just need to whisk a bit longer to work out the lumps if you don’t.  I prefer the extra step of sifting to the extra time spent stirring but it’s totally up to you.  It mixes up just fine either way.

Also, this frosting will be slightly runny (as opposed to fluffy like traditional frosting) and will firm up as it sets. Almost like a ganache.  To keep your cupcakes looking smooth and glossy, frost them FAST.  If your frosting starts to firm up while you’re still working, you can heat and whisk it just slightly to “loosen” it up again. The cupcake pictured above is one that I did not frost quickly enough.  So you can see the frosting went on just fine – and tasted great – but it doesn’t have that smooth, glossy finish that the first dozen did.


Finally, a variation.  Because I want you to have options.  I am a firm believer in lots and lots of options.

This cake is traditionally baked as a sheet cake.  Hence the name “Texas Sheet Cake”.  We Texans are clever like that.  Anyway, if you DO choose to bake it as a sheet cake, you can use a jelly roll pan or a large cookie sheet (Approx 11″ x 15″ and at least 1 inch deep).  The additional perk to this method is that you can simply pour the frosting on the still warm cake and it practically spreads itself.  None of that pesky “wait for the cake to cool completely” crap.  Then let the frosting set, slice it into bars and enjoy!

Recipe: Zucchini-Banana Muffins

I did a lot of baking over the weekend.  It made me realize that I have yet to share any of my favorites recipes with you, which is silly because I love to cook and I’ve got some tasty recipes over here.  Recipes that want to be shared.  Like these muffins.  They are easy and just a little bit sweet.  (Coincidentally, just how I like my men…wink wink!)  Seriously though, they are a cinch to throw together and make a great breakfast or snack and the fact that they include zucchini is a bonus in the height of zucchini season.

A couple of notes before we get started: this recipe is adapted from a Martha Stewart recipe.  I cut the sugar way down, it’s a muffin – not a cupcake – for goodness sake.  Also, I upped the banana a bit and I feel like that really helped to keep the muffins nice and moist.  The result is a light, flavorful muffin that will hit the spot whether you slather it with cream cheese at brunch or just nibble on it plain while you brainstorm about tonight’s dinner menu and field questions about Lightning McQueen.

(Please forgive my terrible photography.  The muffins are delicious, I promise.)


Zucchini-Banana Muffins

Makes 12 standard size muffins

Ingredients

1 3/4 Cups all-purpose flour

1/2 Cup ground flaxseed (I used Bob’s Redmill Flax Meal)

1/2 Cup lightly packed brown sugar

2 tsp. baking soda

1 tsp. baking powder

1/2 tsp. salt (I use Real Salt – finely ground sea salt)

1 tsp. cinnamon

1 1/2 Cups coarsely grated zucchini (about 1 medium to large-sized zucchini)

1/2 Cup mashed ripe banana

3/4 cup whole milk

1 egg – lightly beaten

1 tsp vanilla

Directions

  1. Preheat oven to 350 degrees.  Prep 12 standard muffin cups with cooking spray or paper liners.  In a large bowl, whisk together dry ingredients: flour, flax meal, brown sugar, baking soda, baking powder, salt and cinnamon.  Add banana and zucchini and stir to combine.
  2. In a small bowl, whisk together wet ingredients: milk, egg and vanilla.  Add milk mixture to flour and mixture and stir until combined.  Be careful not to over mix.
  3. Divide batter among 12 muffin cups, the cups will be about 3/4 full.  Bake 20-25 minutes or until golden brown and a toothpick inserted in the center comes out clean.  Let muffins cool completely in pan on a wire rack.  Or just eat them.  I’m not the boss of you.  Do what you want.

By the way, these freeze nicely.  So you can make a batch and keep the leftovers in the freezer for another day if you like.